Prepare to Prevent Emergencies
In an emergency dial 999 and get professional help
Ambulance for medical emergencies. Fire & Rescue / Mountain Rescue for scooter recovery
That’s what they are there for.
FIRST, see our General Page on Safety
1 Plan for it all going wrong!
When conducting your reccys, always have in mind what could go wrong and how can it be mitigated. Note steep slopes, cross cambers, unprotected drops, deep water, roads, etc.
2 First Aid & Medical.
We have always said that we do not provide First Aid but that we will assist in getting help. The following is copied from our yearly Programme of Rambles ‘Important Information’:
Medical: Anyone with a condition which could involve an unusual emergency response should understand that there may be no mobile phone reception where we are rambling. Please consider this before booking on a ramble.
Emergencies: We do not provide first aid. You are encouraged to carry a small First Aid kit & Space Blanket with you. We will endeavour to call the emergency services if the situation requires.
3 Emergency Access
Key to this is knowing where you are and where vehicles can get to for a recovery (of person or scooter). This needs to be done on the reccys and recorded on the Ramble Report Form.
Phone signal strength is patchy in National Parks and other rural locations. Check what it is like on your network in various areas when conducting reccys.
Have the phone numbers of the Rangers and Visitor Centre. Invite Rangers to come on the ramble.
4 Mechanical Breakdowns & Running out of Battery.
Punctures seem to be the main problem – especially in Tramper front wheels. These can often be overcome in the short term by pumping back up or replacing the wheel on the ramble. For other problems, towing might be the answer. Although our ‘Field Support Unit’ (the toilet trailer) can carry a Tramper, this has many safety issues and would be best avoided if possible. See how to convert the Field Trailer for recovery
MORE DETAIL
First Aid Priorities – DR ABC
DR = Danger. Before approaching the casualty, always make sure the area is safe.
Response:
Check if the casualty is responsive or unresponsive. As you approach them, introduce yourself and ask them questions to see if you can get a response. Kneel next to their chest and gently shake their shoulders, asking, ‘What has happened?’, ‘Open your eyes!’.
- If the casualty opens their eyes, or gives another gesture, they are responsive.
- If they do not respond to you in any way they are unresponsive and should be treated as quickly as possible.
Airway:
Check that the airway is open and clear. Open the airway by placing one hand on the forehead to tilt the head back and use two fingers from the other hand to lift the chin.
- If they are unresponsive, move on to breathing as quickly as possible.
Breathing :
Check if the casualty is breathing normally. Place your ear above their mouth, looking down their body. Listen for sounds of breathing and see if you can feel their breath on your cheek. Watch to see if their chest moves. Do this for 10 seconds.
- If they are unresponsive and not breathing, you need to call 999/112 for emergency help and start Cardio-Pulmonary Resuscitation (CPR) straight away. Ask a helper to find and bring a defibrillator (AED).
- If they are responsive and breathing move on to circulation.
Circulation :
Once you have established they are breathing, look and check for any signs of severe bleeding.
- If they are bleeding severely you will need to control and treat the bleeding by applying direct pressure to the wound. Call 999/112 for emergency help.
- If they are unresponsive and breathing but with no bleeding, put them in the recovery position and call 999/112 for emergency help.
First Aid Equipment Carried
There is a small first aid kit and space blanket in the tool bag. In addition to the foil blanket, erect the toilet tent over the casualty to help keep them warm.
Going for Help
If there is no phone signal, then send TWO people to summon help. Make sure they have the location of the casualty and the location of the nearest access point Written Down. Tell them to return to you once they have made contact.
Know Where You Are
OS Maps
Have a paper map with you and know how to work out the OS Grid Reference. Make sure you know where you are on the map at all times.
Mobile Phones
A Smart Phone can tell you your location via various apps. It can also find the location of others you have set up to find. On iPhone the built-in app is ‘Find Friends’.
Ourdoor Active
Our preferred method of recording and saving routes is on Outdoor Active. This free app comes with OpenStreetMap but we have been given access to OS 1:25k maps for the whole of Britain for those leaders who then publish their routes to everyone to use.
Our rambles are recorded on our Routes page
What3Words
What3Words is an app that gives the location of anywhere in the world to a 3 metre square. https://what3words.com/about-us/
Examples of people saved by What3Words: https://www.bbc.co.uk/news/uk-england-49319760
999 uses any available network
Mobile Phone coverage in the countryside is variable. When out reccying, try to record the signal strength on your phone at various locations.
Each operator produces a Coverage Map: O2, EE, 3, Vodaphone.
On a ramble, if you don’t have a signal, try another rambler’s phone which is on a different network.
A Text Message will often get through when a phone call won’t.
Prepare for Difficult Terrain
Brief ramblers about:
Steep climbs or difficult terrain – keep well back from each other. Allow person in front to complete the climb before the next one goes.
Steep descents – Switch Tramper to low speed and turn speed dial down.
Cross cambers – Sit on up-hill edge of seat to increase stability.
Unprotected Drops – Single file and well away for the edge.
Deep Water – Check depth first. Go slowly, one at a time.
Road Crossing – Use marshals in High Viz jackets.
Path Blockages
Some gates are narrow and made more difficult if the ground has worn away causing the scooters to lean over. A small spade or an adze can be used to level this off. (Try to do this during or immediately following the initial reccy).
Expect fallen, or dangerous trees if there has been a gale just before the ramble. Strong winds on the day of the ramble can cause areas to be closed without notice.
Thoughts to minimise risk of an unexpected blockage:
Involve the authorities from the start. That might be the Forestry Commission, National Trust, National Park Wardens, County Council Footpath Officers, land owners etc.
Have alternative routes in mind.
Re-reccy the route within two weeks prior to the event.
Take pruning shears, lopping shears, folding saw, and spanners for self-help.
Mechanical Failure
Field Trailer. This should only be towed by an experienced person.
Loan Scooters. If there is a spare Loan Tramper at the start of the ramble, please take it with you as a ‘spare’. It can be used to give a tired walker relief, share the towing, or as a replacement in the event of a breakdown. It is of no use in the MSU! Alternatively, it can be loaned (for free) to any person who is on a less-than-suitable scooter or one that is not fully charged.
Tools. There is a selection of tools in the bag on the Field Trailer.
Beamer (Tramper) can be contacted during the week on 01794 884 766.
Tramper Status LEDs. If a Tramper fails, look at the small LED on the dashboard and count the number of flashes. This Fault Code will be in two groups which Beamer will ask for.
Twist Grip
2 Flashes, Gap, 3 Flashes, Gap (then repeats) (Code might be different on different models). A common fault is when the twist grip has not returned to its fully closed position. Check that it can be opened fully then let go and see if it snaps back. Then try opening it just a little way and let go. It should still snap fully closed. A common reason for this not happening is the twist grip having been pushed onto the handlebar and so rubs on the inside. Use a Posidrive screwdriver to loosen the two screws and pull the twist grip outwards. A cause of this happening is the Tramper having fallen onto its side.
Tyres
Tramper tyre pressures: Front 35psi, Rear 15psi. The rear can be lowered to about 5psi for use on soft sand.
Punctures. The front tyres on the Trampers are prone to punctures – particularly after blackthorn hedges have been cut. The loan Trampers should have OKO tyre sealant in them. This should stop air leaking. Sealant is recommended for ALL scooters.
- Pump Up. This might be enough to get the scooter home but might need repeating. There is a foot pump in the tool bag.
- Replace the Wheel. A spare is carried on the Field Trailer.
The wheel will need to be clear of the ground. There are several ways to achieve this. Perhaps the easiest and safest way is for two people to lift the front a little while a third inserts a block under the front.
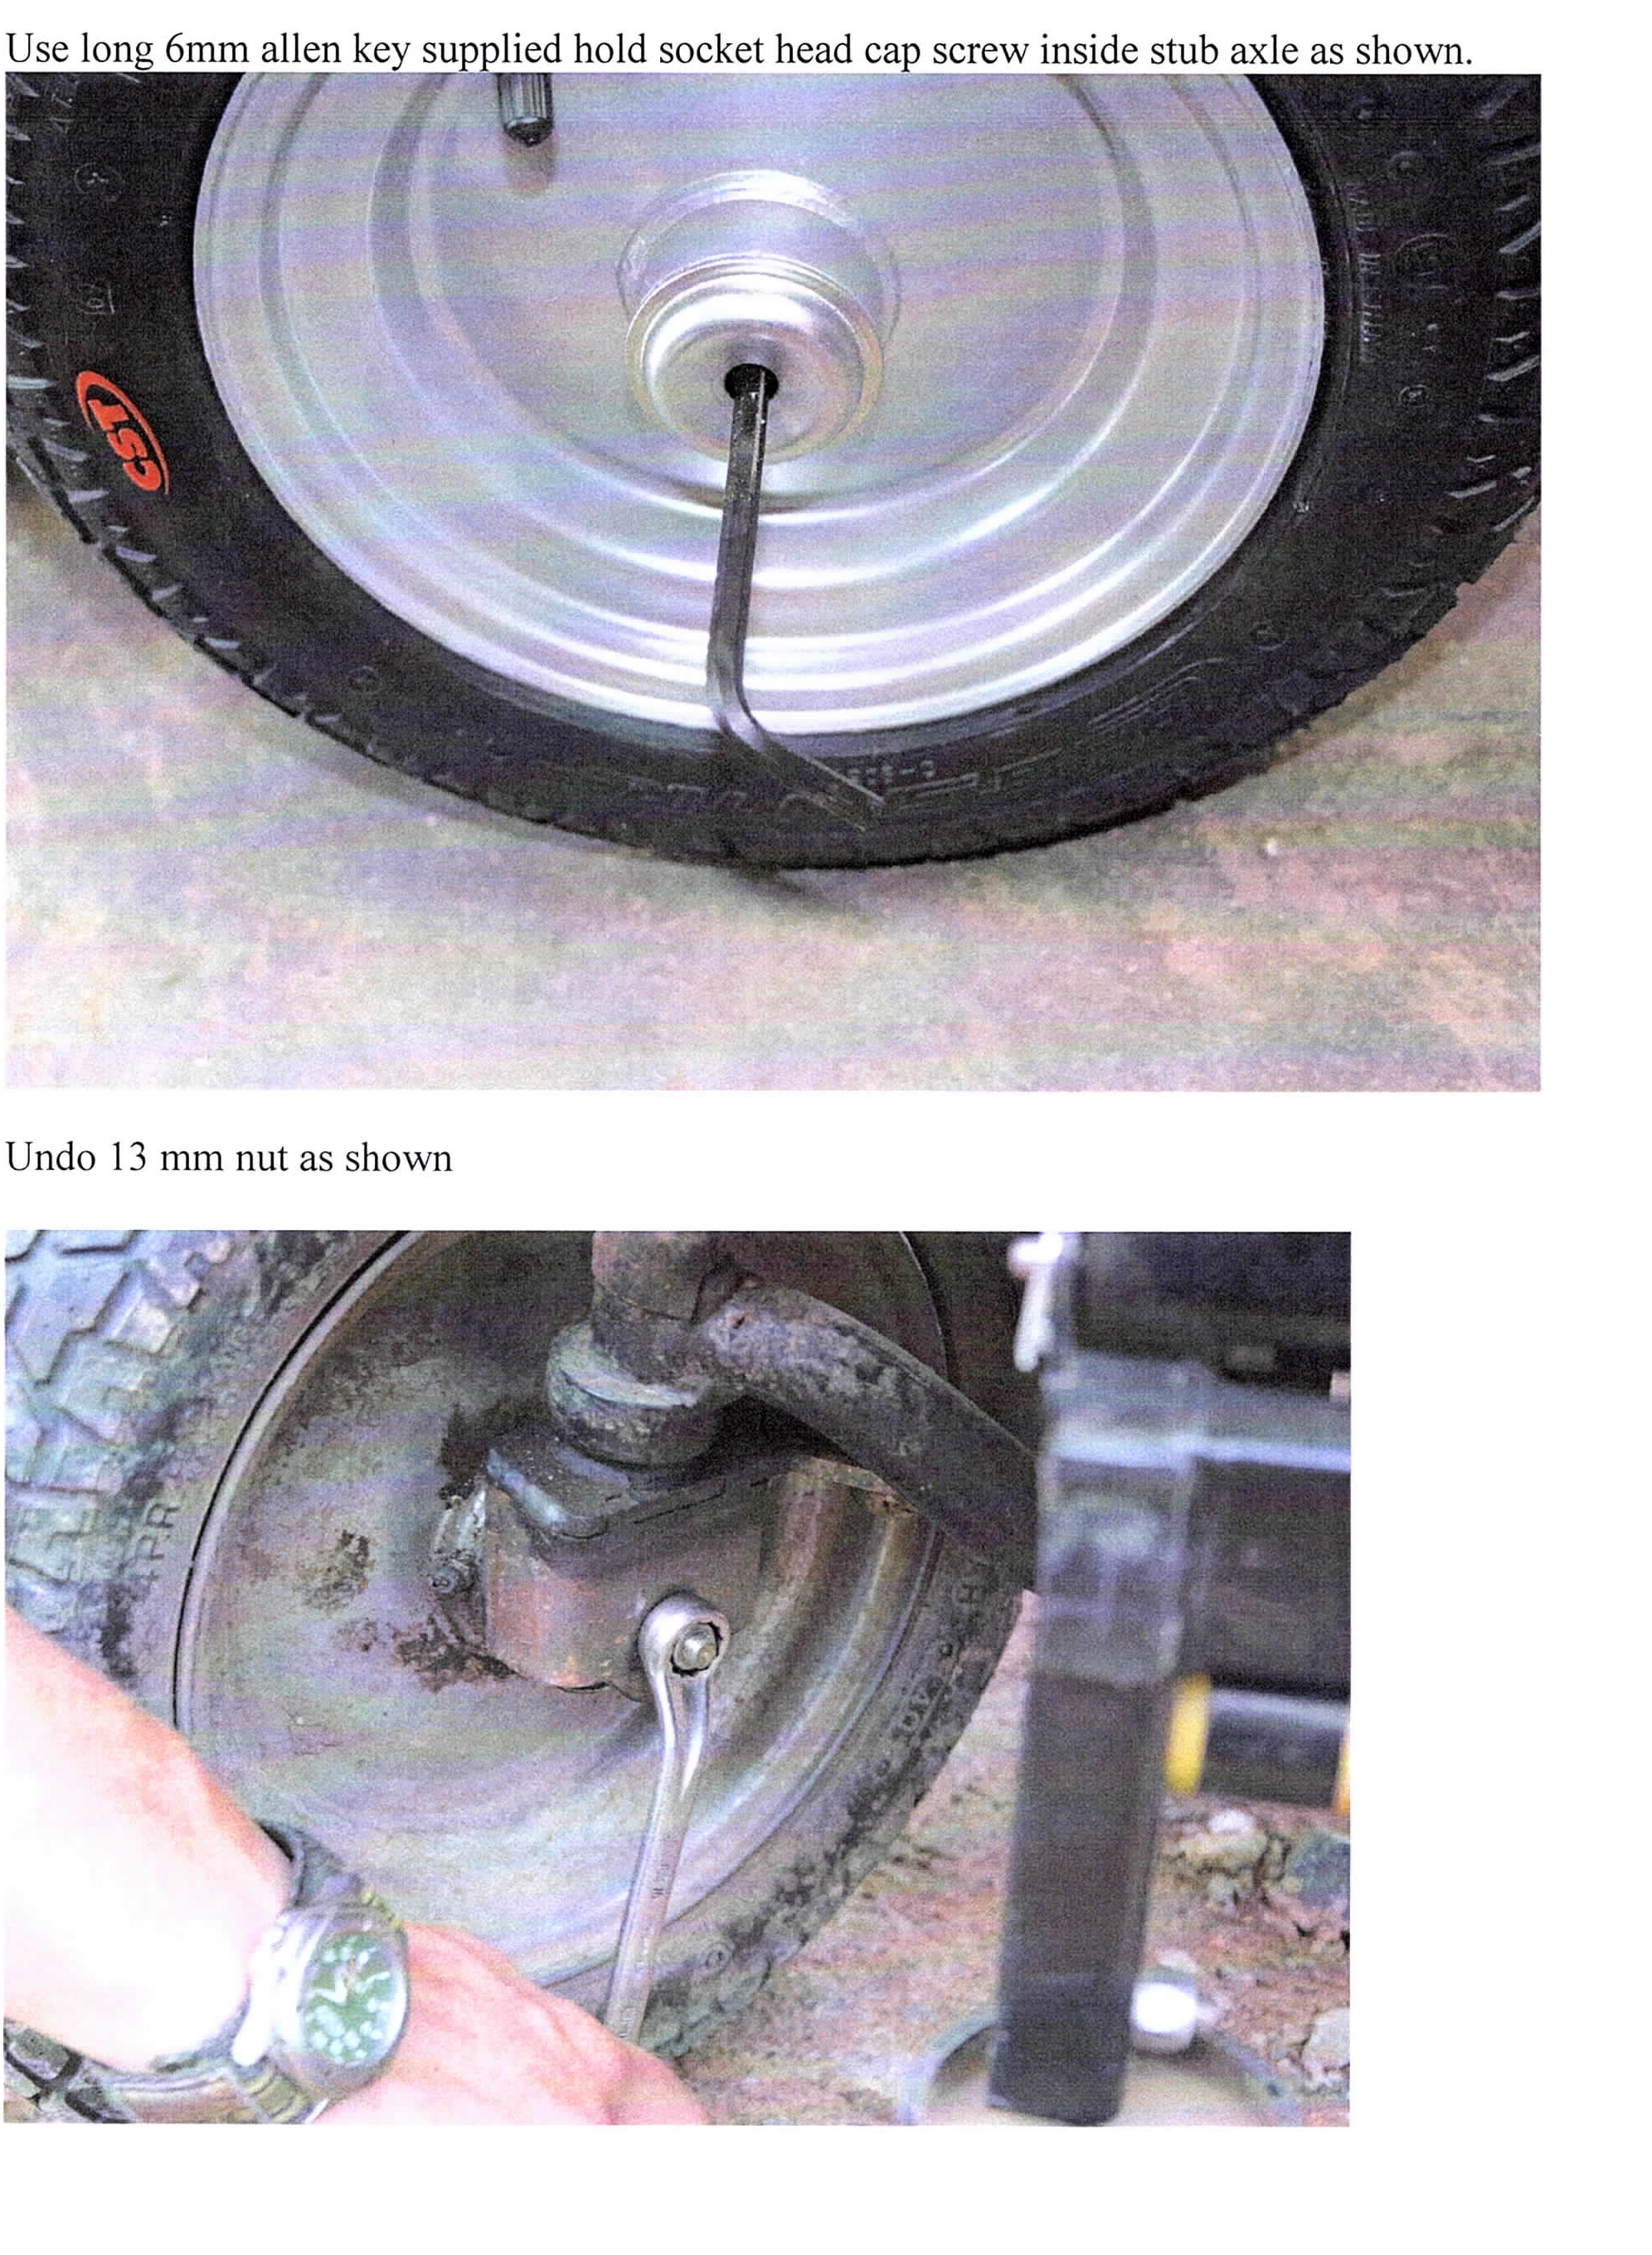
On the outside of the wheel, there will either be a black plug to remove (with a flat screwdriver) or a metal cap to unscrew (there is a large ring spanner in the tool bag). Then introduce the very long 6mm Hex key until it engages with the bolt head.
On the inside of the wheel, there is a 13mm nut. Hold the Hex key still and undo nut with a spanner. Replace the wheel. See photos at end of document.
- Repair the inner tube. Tyre leavers and repair kit are in the tool bag.
Valve Leaks. Any tyres with sealant in them are prone to leak from the valve; particularly after checking the pressures. After checking pressures, it is vital to check that the valve is not leaking. This can easily be done by wiping spittle across the end of the valve and looking to see if a bubble forms over about 5 seconds. (Special fluid or washing up liquid can be used if you don’t like the idea of using spittle.)
If a bubble does form, the only remedy is to remove the valve core. You should find a bit of ‘stuff’ stuck under the valve seat. The valve core can be cleaned or replaced. Schrader valve cores are cheap to buy in bulk on the internet and there are some in the Tool Bag.
Valve Blocked. Sometimes the puncture sealant solidifies in the tube under the valve. This stops air going in or coming out. To clear, remove the valve core. Take a straightened-out paper clip (or similar) and poke into the valve body. Work it around until the blockage is pierced. In extreme case the valve has to be cut off to remove the air and the tube replaced.
Moving a Scooter
Most (all?) scooters have a Push Mode. Somewhere there will be a leaver which will disengage the drive and allow the scooter to be pushed.
THERE WILL BE NO BRAKES so take care and do not do this with someone on the scooter unless there are sufficient people holding the scooter to control it on a hill of any sort.
On the four-wheel Tramper there are two systems; electrical and mechanical.
Mechanical Brake Release. On the four wheel Tramper this is very hard to get at and stiff to operate – which is why there is the electrical option. On the three wheel Tramper TWS the leaver is clear to see and relatively easy to operate (with your foot?).
Electrical Brake Release is a switch which, when operated, disengages the brake. This only works if there is some battery left to energise the brake release. On Mk1 Trampers the switch is under the front of the seat. On Mk2 the switch is on the dashboard around the right hand corner. A sleeve has to be pulled out before the switch will move.
The following is copied from the Tramper Manual Mk2 four wheel Tramper:
Push mode. The Tramper is fitted with a push mode switch. This is situated on the right-hand end of the dash board. The switch should always be in the DOWN position in normal use. If it is necessary to manually push the Tramper, moving this switch to the UP position with the ignition switched ON will override the automatic parking brake and will allow the Tramper to be pushed manually (note the switch toggle is a Iocking type and the operating leaver must be pulled out before moving up or down, this is a safety feature to prevent inadvertent operation of the switch). The switch will only have effect if the Tramper is switched on and stationary. If the push mode has been selected i.e. switch in UP position, and the Tramper is then switched off with the key, the push mode will disengage and will not reactivate when the ignition is switched on again.
Always check the push switch is in the OFF (down) position before turning the key on. The “status” light will flash if you turn key on with the push switch on (up) position, and the Tramper will not drive, return both switches to the off position before starting again.
Towing. This places a great strain on the motor of the scooter doing the towing. On a Tramper, watch the current meter does not exceed the recommended limit. Go slowly and, if covering a long distance, change the towing scooter regularly. Have people walking alongside the towed scooter to steady it if necessary and to give it assistance up hills.
Make sure that the attachment points don’t interfere with steering and are strong enough. One of the tie-down straps used with the toilet tent can be used as the tow rope. If towing a scooter with its brake released, attach another two straps to the rear of the towed scooter and have two people holding them to act as brakes. TAKE GREAT CARE.
Power Meter
The Tramper meter displays: Voltage (Volts), Current (Amps), Current used over time (Amp Hours) and Percentage of battery power left. To see the different values, press either of the arrows to cycle through them.
Volts. A 12-volt battery must never be discharged below 11 volts or it will be permanently damaged.
The four wheel Tramper has two batteries = 24 volts so minimum is 22 volts.
The TWS has three = 36 volts so minimum is 33 volts.
Current. Measured in Amps. Maximum steady currents are as follows. Exceeding these for a few seconds is permissible to overcome an obstacle but any more than that will overheat the motor.
| Model | Max Continuous current. Amps | Peak current,
Short Duration (5 seconds). Amps |
Minimum
Voltage |
| Mk 1 Tramper | 30 | 100 | 22 Volts |
|
Mk 2 Tramper |
40 |
120 |
22 Volts |
| TWS Tramper | 25 | 100 |
33 Volts
|
Changing a Wheel